Installation and Testing
The Gpufit library can be used in several ways. When using a pre-compiled binary version of Gpufit, the Gpufit functions may be accessed directly via a dynamic linked library (e.g. Gpufit.dll) or via the external bindings to Gpufit (e.g. the Matlab or Python bindings). For more information on the Gpufit interface, see Gpufit API description, or for details of the external bindings see External bindings.
This section describes how to compile Gpufit, including generating its external bindings, from source code. Building from source is necessary when a fit model function is added or changed, or if a new fit estimator is required. Building the library may also be useful for compiling the code using a specific version of the CUDA toolkit, or for a particular CUDA compute capability.
Gpufit binary distribution
A binary distribution of the Gpufit library is available for Windows. Use of this distribution requires only a CUDA-capable graphics card, and an updated Nvidia graphics driver. The binary package contains:
The Gpufit SDK, which consists of the 32-bit and 64-bit DLL files, and the Gpufit header file which contains the function definitions. The Gpufit SDK is intended to be used when calling Gpufit from an external application written in e.g. C code.
The performance test application, which serves to test that Gpufit is correctly installed, and to check the performance of the CPU and GPU hardware.
Matlab 32 bit and 64 bit bindings, with Matlab examples.
Python version 2.x and version 3.x bindings (compiled as wheel files) and Python examples.
Java 8 32 bit and 64 bit bindings, with Java examples.
This manual in PDF format.
To re-build the binary distribution, see the instructions located in package/README.md.
Building from source code
This section describes how to build Gpufit from source code. Note that as of the initial release of Gpufit, the source code has been tested only with the Microsoft Visual Studio compiler.
Prerequisites
The following tools are required in order to build Gpufit from source.
Required
CMake 3.11 or later
A C/C++ Compiler
Linux: GCC 4 (tested with 4-6)
Windows: Visual Studio 2013 (tested with 2013 - 2019)
Optional
Boost 1.58 or later (required if you want to build the tests)
MATLAB if building the MATLAB bindings (minimum version Matlab 2012a)
Python if building the Python bindings (Python version 2.x or 3.x). Note that the “wheel” package is required when building the Python binding.
Java if building the Java bindings (minimum Java JDK version 8)
PDF Latex installation (like Miktex) if converting the documentation from Latex to PDF.
Source code availability
The source code is available in an open repository hosted at Github, at the following URL.
https://github.com/gpufit/Gpufit.git
To obtain the code, Git may be used to clone the repository, or a current snapshot may be downloaded directly from Github as Gpufit-master.zip.
Compiler configuration via CMake
CMake is an open-source tool designed to build, test, and package software. It is used to control the software compilation process using compiler independent configuration files, and generate native makefiles and workspaces that can be used in the compiler environment. In this section we provide a simple example of how to use CMake in order to generate the input files for the compiler (e.g. the Visual Studio solution file), which can then be used to compile Gpufit.
First, identify the directory which contains the Gpufit source code (for example, on a Windows computer the Gpufit source code may be stored in C:\Sources\Gpufit). Next, create a build directory outside the source code source directory (e.g. C:\Sources\Gpufit-build-64). Finally, run cmake to configure and generate the compiler input files.
Using the CMake Graphical User Interface
There is a graphical user interface available for CMake, which simplifies the configuration and generation steps. For further details, see Running CMake. The following steps outline how to use the basic features of the CMake GUI.
First, select the source code directory (the top level directory where the Gpufit source code is located), and the build directory (where the binaries will be built). For this example, the source directory might be C:\Sources\Gpufit, and the build directory might be C:\Sources\Gpufit-build-64.
Next, click the “Configure” button, and select the desired compiler from the drop down list (e.g. Visual Studio 12 2013). Under Optional platform for Generator, select the desired architecture (e.g. x64 to compile 64-bit binaries).
Once configuration is complete, CMake will have automatically found the Matlab installation, and the installation directories will be listed in the NAME and VALUE columns. If the Matlab installation was not found, the entries in the VALUE column can be manually edited.
Next, click on Generate to generate the Visual Studio solution files, which will be used to build the Gpufit package.
Running CMake from the command line
The following commands, executed from the command prompt, assume that the cmake executable (e.g. C:\Program Files\CMake\bin\cmake.exe) is automatically found via the PATH environment variable (if not, the full path to cmake.exe must be specified). This example also assumes that the source and build directories have been set up as specified above.
cd C:\Sources\Gpufit-build-64
cmake -G "Visual Studio 12 2013 Win64" C:\Sources\Gpufit
Note that in this example the -G flag has been used to specify the 64-bit version of the Visual Studio 12 compiler. This flag should be changed depending on the compiler used, and the desired architecture (e.g. 32- or 64-bit). Further details of the CMake command line arguments can be found here.
There is also a graphical user interface available for CMake, which simplifies the configuration and generation steps. For further details, see Running CMake.
Common issues encountered during CMake configuration
It’s strongly recommended to use the latest available CMake version. Especially the find CUDA, Matlab, Python capabilities of CMake get updated often.
Boost NOT found - skipping tests!
If you want to build the tests and Boost is not found automatically, set the CMake variable BOOST_ROOT to the corresponding directory, and configure again.
JAVA JNI NOT found - skipping Gpufit Java binding!
If you want to build the Java binding and CMake cannot find Java, you can set the CMake variable JAVA_HOME to specify a Java installation explicitely.
Specify CUDA_ARCHITECTURES set
If you need a specific CUDA architecture, set CUDA_ARCHITECTURES according to CUDA_SELECT_NVCC_ARCH_FLAGS.
CMake finds last installed CUDA toolkit version by default
If there are multiple CUDA toolkits installed on the computer, CMake 3.7.1 seems to find by default the lowest installed version. In this case set the desired CUDA version manually (e.g. by editing the CUDA_TOOLKIT_ROOT_DIR variable in CMake).
Specify CUDA version to use
Set CUDA_BIN_PATH before running CMake or CUDA_TOOLKIT_ROOT_DIR after first CMAKE configuration to the installation folder of the desired CUDA version.
Required CUDA version
When using Microsoft Visual Studio 2015, the minimum required CUDA Toolkit version is 8.0.
No suitable Matlab and/or MX_Library version found - skipping Gpufit Matlab binding!
CMake might not be able to locate Matlab, in which case this message will be shown. Try to set the Matlab_ROOT_DIR variable manually (for example “C:/Program Files/MATLAB/R2020b” or “/usr/local/Matlab/2020b” on Linux) and run CMake again.
Python launcher
Set Python_WORKING_DIRECTORY to a valid directory, it will be added to the Python path.
Matlab launcher
Set Matlab_WORKING_DIRECTORY to a valid directory, it will be added to the Matlab path.
Documentation build issues
Note that the several Python packages are required to run the “documentation_create_latex.bat” script on Windows systems. Please ensure that the “sphinx” and “sphinx_rtd_style” packages are installed in your Python distribution.
PDFLATEX not found
When using Miktex, if the PDFLATEX package is not automatically found, the path to pdflatex.exe can be specified to CMake with the MIKTEX_BINARY_PATH variable (available under Advanced options).
Compiling Gpufit on Windows
After configuring and generating the solution files using CMake, go to the desired build directory and open Gpufit.sln using Visual Studio. Select the “Debug” or “Release” build options, as appropriate. Select the build target “ALL_BUILD”, and build this target. If the build process completes without errors, the Gpufit binary files will be created in the corresponding “Debug” or “Release” folders in the build directory.
The unit tests can be executed by building the target “RUN_TESTS” or by starting the created executables in the output directory from the command line.
To install the python gpufit package go to “Release” folder and here you find Gpufit resp Cpufit python packages.
Compiling Gpufit on Linux
A successful build has been verified on Ubuntu 18.04 LTS with gcc 5.5 and CUDA 9.1 following the instructions on the NVidia website. CMake needs to be at least version 3.11. To perform the tests, a development version of Boost should be installed (e.g. libboost-all-dev).
The following commands were executed.
git clone https://github.com/gpufit/Gpufit.git Gpufit
mkdir Gpufit-build
cd Gpufit-build
cmake -DCMAKE_BUILD_TYPE=RELEASE ../Gpufit
make
In case, during make there is an error “unsupported GNU version! gcc versions later than X are not supported”, it means that CUDA needs an older version of gcc. Provided that such a version is installed on the system you can choose it with the -DCMAKE_C_COMPILER option to cmake. For example, for CUDA 9 one should add -DCMAKE_C_COMPILER=gcc-5 in the call to cmake.
The tests can be run for example by “make test”. Run the performance comparison with
./Gpufit_Cpufit_performance_comparison
To install the Python package
cd pyGpufit/dist
pip install pyGpufit-X.Y.Z-py2.py3-none-any.whl
To run the Matlab package you need to tell Matlab to use a newer version of the C++ standard library
export LD_PRELOAD=/usr/lib/x86_64-linux-gnu/libstdc++.so.6
matlab
Then in Matlab add the matlab output directory to the path and execute some examples.
addpath('XX/Gpufit-build/matlab');
cd('XX/Gpufit/Gpufit/matlab/examples');
gauss2d();
MacOS
Gpufit has not yet been officially tested on a computer running MacOS with a CUDA capable graphics card. However, satisfying the Prerequisites and using CMake, we estimate that the library should build in principle and one should also be able to run the examples on MacOS.
Using cuBLAS
Optionally, Gpufit may be configured to make use of the cuBLAS library. This library is used for solving the equation system during the fit process.
Several benefits are obtained by using cuBLAS:
Moderately faster fitting performance.
Improved numerical stability.
The number of fit model parameters may be as high as the number of threads per GPU thread block (1024). Without cuBLAS, the maximum number of model parameters is limited to 31.
To include cuBLAS functionality in Gpufit, the USE_CUBLAS flag may be set during the CMAKE configuration step. Note that the Gpufit cuBLAS feature is only available for 64-bit architectures, and for code built with CUDA toolkit version >= 7.0. Finally, it is important to note that cuBLAS is not statically linked in the Gpufit DLL, but rather it is dynamically linked. Hence, when distributing applications, the cuBLAS DLL (e.g. cublas64_80.dll for CUDA toolkit version 8) must be packaged along with Gpufit.dll.
Running the performance test
The Gpufit performance test is a program which verifies the correct function of Gpufit, and tests the fitting speed in comparison with the same algorithm executed on the CPU.
If Gpufit was built from source, running the build target GPUFIT_CPUFIT_Performance_Comparison will run the test, which executes the fitting process multiple times, varying the number of fits per function call. The execution time is measured in each case and the relative speed improvement between the GPU and the CPU is calculated. A successful run of the performance test also indicates also that Gpufit is functioning correctly.
The performance comparison is also included in the Gpufit binary distribution as a console application. An example of the program’s output is shown in Fig. 1.
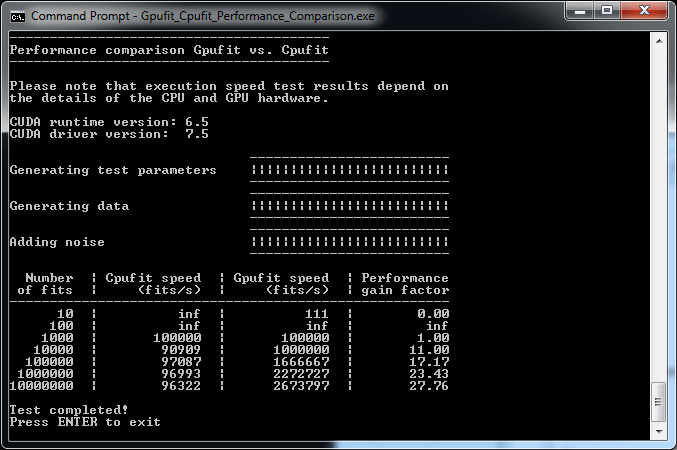
Fig. 1 Output of the Gpufit vs Cpufit performance comparison